
Chipp Devlog: Creating Consistency
Chipp: A Sub-Par adventure is a top-down RPG with a golfy twist. The core draw of the game is to give players a unique character controller that provides them with an entirely new perspective on their environment. This is done both to distance Chipp from its contemporaries, as well as to offer a set of challenges and mechanics unique only to this game. This is where our level design comes in. From the very beginning, Chipp’s core pillars were solving puzzles, fighting enemies, and exploring environments but with the twist of the unique perspective of a ball. Originally, our designers felt the best way to do this was to imitate the puzzle-box design of the dungeons found in Nintendo’s Legend of Zelda franchise. We ran into some problems with this however...
Our Problem
Our first design split five level designers up across a tutorial and four floors of a dungeon. The designers collectively outlined the progression of the dungeon, some vague level metrics, and how the distribution of mechanics would be handled, before splitting off to greybox their own designs independently. When the levels were connected, we found our experience was not only too long (spanning about 45 minutes of uninterrupted gameplay), but that there was a strong inconsistency between each floor. Our demo felt as though the player was experiencing four completely separate takes of what a level would be, rather than one cohesive dungeon. Establishing this sense of connectivity between the rooms of our dungeon was vital to our game’s sense of immersion, as level verticality played a large role in the level’s progression leaving our game feeling “amateurish.”
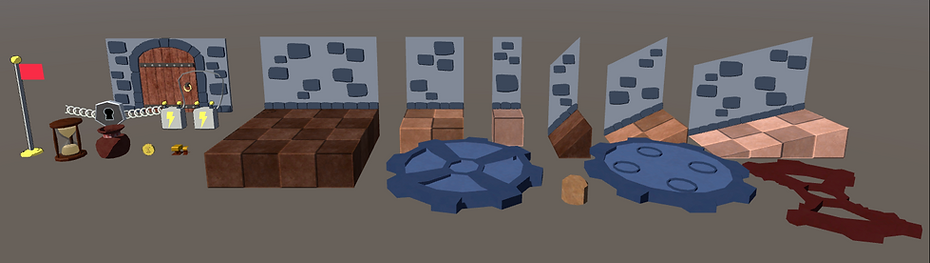
Chipp's current modular level kit
Creating A Modular Kit
One of the first and most immediate things to deal with was the lack of any metric constraints. All designers were given a boundary to work within but each designer had their own understanding of how big a doorway, ramp, or catwalk should be. While an obvious solution in hindsight, I ended up creating a modular kit which provided greyboxed environmental pieces for terrain, and all level mechanics.
This wasn’t a simple task, however, as this meant that our game’s levels had to be able to tile perfectly for complete consistency. I referred back to our touchstone game, The Legend of Zelda: A Link to the Past, for reference. In that game, all art is done with 2D sprites imitating an oblique angle. This even rings true for the sequel, A Link Between Worlds,

which aimed for an artstyle much closer to that of what we were going for with our game, maintaining that same top down oblique angle camera perspective, but now accounting for 3D graphics. From this game, I analyzed how models were constructed, often appearing wider at the top to simulate a much more zoomed out perspective.
When it came to actually producing the kit, I began by creating a flat plane using Unity probuilder. I made sure the plane was large enough for the player to stand while being about twice as large as they were. I then created a series of “rooms” of various sizes, using this plane duplicated and placed beside itself. I positioned the player inside each room and moved around within, testing for how cramped or empty each space felt. What I quickly discovered was that a hallway two planes wide was just wide enough to be a tricky space to cross, but was rather claustrophobic for the average room. I tested planes snapped in patterns of 3x3 and 4x4 as well and found a nice sweet spot with the latter, proving to be a nice comfortable space for a player to move around within. Using these two established planes as reference, I created an additional third one a size inbetween the smaller and larger planes. Lastly, to provide level designers with some more variety of how they could construct levels, I created triangular variants of these tiles.
Going off of the floor tiles, I then created walls equal to the width of each plane with a rough estimate for how high they should be. I wanted them to give off a feeling of scale when compared to the player in order to further cement the player’s form as well as how out of place they are within their environment. The rest of the assets came naturally, either using the size of one of the floor tiles as a basis for their size, or in the case of the railings, the ball itself in order to ensure the metrics of each area remain consistent.

The original modular level kit
With the modular kit created, I updated all dungeon floors to account for this new modularity. While I tried my best to maintain the original design of each room, it was necessary to redesign a few rooms in the process, either as a result of the dungeon layout being moved around or to bring an existing design in line with the rest of the dungeon. Before long, the dungeon had seen a massive overhaul that was met with a much more positive reception than before. Still, there was an issue with the current design. The demo was still far too long.

A redesigned room using the original kit
Overhauling Progression
Because of our current demo’s extreme length in relation to our target time of 15 minutes, more overhauling would need to be done. The team mutually agreed that the structure of the dungeon itself would change. Instead of a large, inter-connected web of rooms ending in a boss door, the game would feature more structured “levels” where the goal was to reach the hole and descend to the next level.
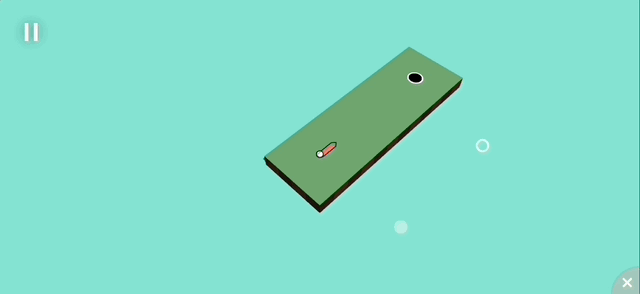
A short demo of Chipp's new progression
Because of the need to redesign the entire dungeon with the mechanics and systems currently in the game, the level designers designated roles to tackle the tutorial and dungeon challenge. I and another one of the team members were chosen to be responsible for the new tutorial. This meant that the player needed to understand and feel comfortable with the core systems and mechanics of our game before even entering the meat of the experience.

To ensure this was achieved, Scott Parker (the other level designer designated to the tutorial) and I listed out all of the mechanics necessary to teaching the player, and then separated them into beats. Using Dungeon Draft, a DnD map creation software, we crafted a layout using the written down beatmaps to outline the function of each room and how they flow together. Finally, it was just a matter of constructing the new design into a level using the now arted modular kit (modelled and textured by yours truly).


The tutorial layout created in Dungeondraft